
Instruction for Use - Silicone Resuscitator
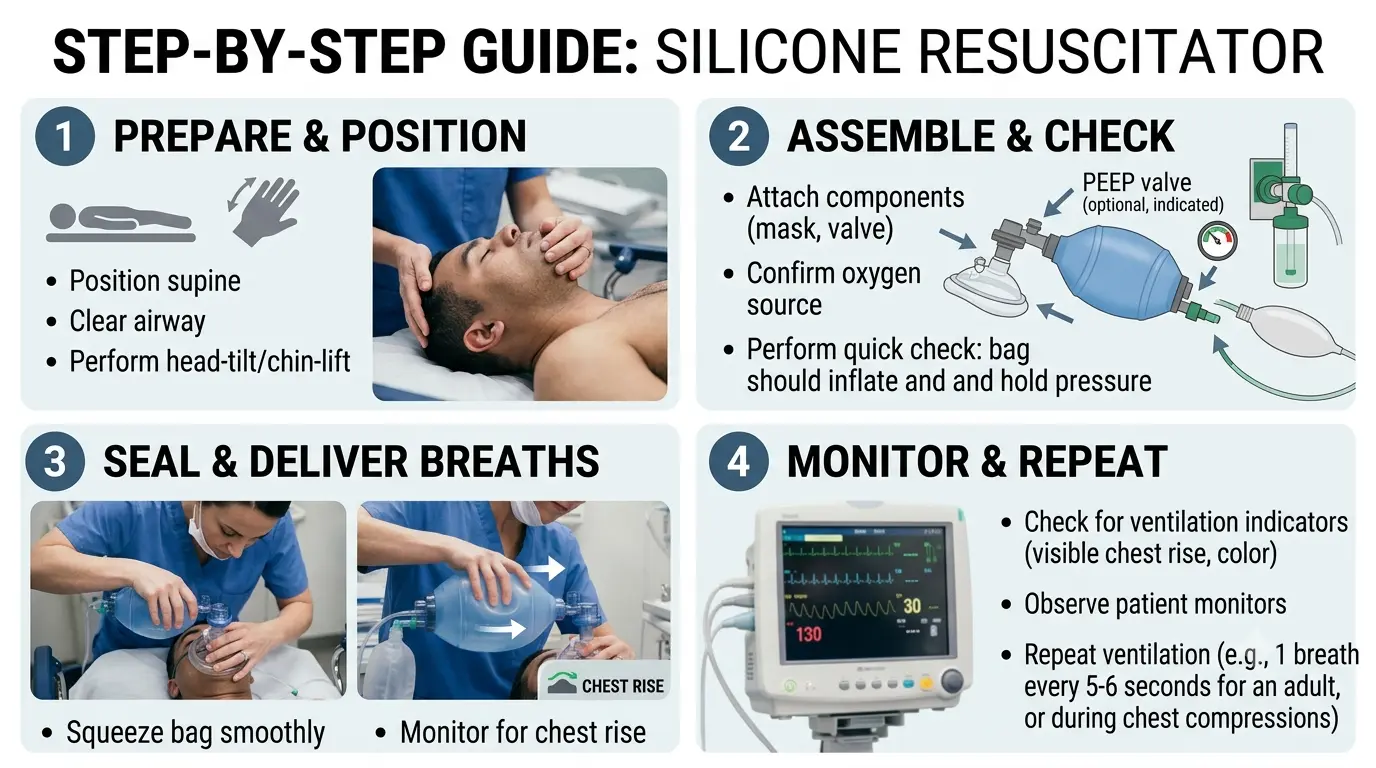
- Preparation and Equipment Check
- A silicone Resuscitator is a self-inflating bag that is part of a complete ventilation kit. Before starting, the medical team ensures the device is fully assembled and operational.
- A complete kit includes:
- Face Mask: Available in various sizes (infant, child, adult) to ensure a proper seal.
- Valve Assembly: The "patient valve" that ensures air flows to the patient and prevents rebreathing exhaled air.
- Self-Inflating Bag: The main reservoir (usually made of clear silicone for sterilization/visibility) that is squeezed.
- Oxygen Reservoir: A bag attached to the intake end that ensures 100% oxygen is delivered.
- Oxygen Tubing: Connects the resuscitator to an oxygen source.
- Initial Check (Before Use):
- Ensure all components are tightly connected.
- Check that the oxygen reservoir bag is attached.
- Leak Test: Squeeze the bag against a gloved hand; the relief valve should activate, and the bag should resist complete compression. If it collapses easily, there is a leak.
Step 1: Open the Airway (Positioning the Patient)
- Successful ventilation begins before you use the bag. You must clear and open the airway.
- Place the patient in a supine (flat on their back) position.
- Use the Head Tilt-Chin Lift maneuver (shown below) to straighten the airway. This is essential, as a simple obstruction (like the tongue falling back) will block all ventilation efforts.
- Alternative (If Trauma is Suspected): If you suspect a spinal injury, use the Jaw-Thrust maneuver instead, which lifts the jaw without tilting the neck.
Step 2: Establish a Mask Seal (The Critical Technique)
- Once the airway is manually cleared, you must establish an airtight seal between the patient’s face and the resuscitator mask. If air escapes, the ventilation is ineffective.
- This is the most challenging step and requires practicing the "E-C Clamp Technique" with one hand.
- Place the Mask: Position the mask over the patient's nose and mouth. The apex (pointed end) of the mask should rest on the bridge of the nose. The broader base should rest on the cleft of the chin.
- Form the 'C': Use the thumb and index finger of one hand to form a 'C' shape. Place the thumb on the top of the mask over the nose bridge, and the index finger on the base near the chin. Press down firmly.
- Form the 'E': Hook your remaining three fingers (middle, ring, and pinky) under the ridge of the patient's jawbone (the mandible). Do not press on the soft tissue of the neck.
- Lift and Seal: Pull the jaw up into the mask (using the 'E' fingers) while pressing the mask down onto the face (using the 'C' fingers). This simultaneously seals the mask and maintains the head-tilt/airway positioning (as seen below).
Step 3: Ventilation and Compression
- When the mask seal is secure (Step 2) and the airway is open (Step 1), you can begin active ventilation.
- Attach the Bag: Connect the valve assembly and the silicone bag to the mask connector, which is firmly sealed on the patient's face (as shown below).
- Squeeze the Bag: Deliver a breath by squeezing the silicone bag.
- Volume: Squeeze just enough to cause visible chest rise. This usually requires only 1/3 to 1/2 of the bag’s volume (approximately 500–600 mL for an adult). Do not over-inflate; hyperventilation is harmful.
- Rate: Deliver breaths smoothly, over about 1 second per squeeze.
- Frequency:
- If the patient has a pulse but is not breathing (Rescue Breathing): Deliver 1 breath every 5 to 6 seconds (10–12 breaths per minute).
- If the patient has no pulse and you are performing CPR: Coordinate with another rescuer. After 30 compressions, deliver 2 quick breaths (pausing compressions for less than 10 seconds).
- Observe Gastric Inflation: If you do not observe chest rise, or if the patient's stomach begins to distend, you are either over-inflating or the airway is blocked (re-check positioning from Step 1 and the seal in Step 2).
Summary of the Procedure
- Position the Patient and Open the Airway (Step 1).
- Seal the Mask using the E-C Clamp (Step 2).
- Ventilate by squeezing the bag smoothly and monitoring chest rise (Step 3).
- Cleaning and Disinfection
- Silicone resuscitators are typically designed to be reusable and autoclavable. After use, the device must be completely disassembled, cleaned thoroughly to remove all organic material, and sterilized according to the manufacturer's guidelines and hospital protocol (e.g., steam autoclaving). The oxygen reservoir bag is often single-use and must be discarded.
Disclaimer
- This guide is for educational purposes only. The use of a manual resuscitator is a critical medical procedure that must be performed by or under the direction of trained medical professionals (e.g., Doctors, Nurses, EMTs, Paramedics). Do not attempt to use this device on a person if you have not been formally trained, except as part of instructed CPR during an extreme emergency.